When installing a composite deck, there are several different things to consider. The size of the deck area, the budget for the project, and the colour scheme are all important. You’ll also need to decide on the pattern that you prefer before you start the installation process.
A well-thought-out decking pattern can add style and character to your outdoor space and bring a bit of flare to your garden. However, some are easier to install than others, and certain designs may require the expertise of a specialist contractor.
In this guide, we’re going to examine some of the most popular composite decking patterns to help you decide which one is the best choice for your outdoor living space.
What Is Composite Decking?
Composite decking is quickly becoming the most popular choice of decking material in the UK. People are steadily moving away from other decking materials such as wood and UPVC and instead choosing composite decking for their outdoor space.
But what actually is composite decking?
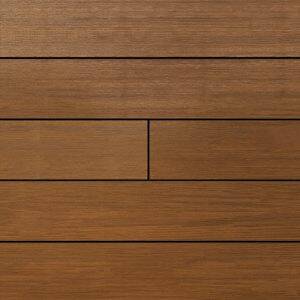
Composite decking is made from recycled wood fibres and plastic polymers. Composite deck boards are made using a process called extrusion, where the material is melted down and then passed through a die to shape it into decking boards.
This material has many advantages over traditional wood decking, which are the reason for its growing popularity.
Longevity
One of the main benefits of composite decking is its amazing longevity. The plastic content within composite boards makes them resistant to water and rot, which makes them very long-lasting. This means that composite decking usually lasts for around 25 to 30 years.
Eco-friendliness
Composite decking is the most eco-friendly option when compared to other decking materials such as wood and UPVC. As it’s made with recycled wood and plastic, it means that no trees are cut down to make it, and waste plastic is reduced.
Low-maintenance
Composite decking requires virtually no maintenance as it doesn’t need to be stained, sealed, or painted. It only needs to be cleaned around once every 6 months using a power washer or warm, soapy water and a soft bristle brush.
Slip resistance
Composite decking is more slip-resistant than wood and UPVC decking. This makes it a good option for wet climates and for use around swimming pools. The deck boards will usually be dry within 30 minutes of water exposure.
UV resistance
Composite decking is also very resistant to UV light and doesn’t fade much over time. With our Clarity composite decking range any fading will occur within the first few months after installation but will only be slight. After this, your decking will hold its colour for years to come. Our Forma and Grande decking range is guaranteed against fading and is UV stable.
8 Laying Patterns For Your Composite Deck
So, now that you’re up to speed on what composite decking actually is and some of its many benefits, it’s time to take a look at some of the most popular laying patterns.
Some of these patterns are pretty straightforward, and most people will be able to do them by themselves. However, some are more difficult and may require the help of a professional contractor.
If you’re feeling extra creative, you can even try and come up with your own unique composite deck board patterns.
1. Single width deck patterns (easy)
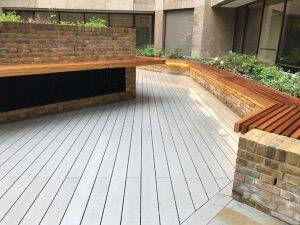
The single width decking pattern is the most commonly used and is one of the easiest to install. To achieve this pattern, you simply lay deck boards with the same width consistently across the entire deck area.
This is the classic deck pattern that you will have seen used for many decking areas. It’s a simple and traditional look that blends in with its surroundings and won’t draw attention away from any other deck features like appliances or furniture.
In terms of installation, the single width pattern is probably the easiest composite decking pattern to install as it can attach directly onto a standard deck framing. This makes it an ideal choice for those that are inexperienced in DIY. It will also be a quick and cheap job for a contractor.
Another benefit of the single width pattern is that it will work well for a deck project of any size. It can be used on small or large patios, decks, and porches.
When used for small decking areas, the simple design won’t overpower the small space, and for larger decks, the straight lines will emphasise the size of the space and give it the appearance of being even larger than it is.
Installation note – when installing deck boards in this pattern, the deck joists can be spaced no more than 16 inches from the centre in order to support the deck boards.
2. Picture frame deck patterns (moderate)
Picture frame patterns are comprised of one or more composite decking boards installed around the outside of the deck area with a standard, single width deck inlay inside. Visually, this creates a more complete look to your deck design and gives your outdoor space a more finished feel.
Although the pattern within is still simple, the picture frame detail gives your deck area a subtle design flare that adds character and charm.
Picture frame designs are versatile, and you can play around with the deck inlay that you have inside of the framing. You don’t have to stick with the single width design if you’d rather try something more complex.
One of the benefits of the picture frame pattern is that the composite decking boards used as the frame will cover up the ends of the boards used for the inlay within the pattern. As well as being aesthetically pleasing, this will also give added protection to your deck boards.
The picture frame pattern is a subtle way to add style to your outdoor space and won’t draw attention away from other features such as railing or lighting. It’s a great choice if you want a pattern that will compliment your outdoor living space but won’t dominate it.
Installation note – the substructure and deck framing will need extra support for the picture frame deck pattern.
3. Diagonal inlay deck patterns (difficult)
The diagonal inlay deck pattern is a complex pattern that can add style and sophistication to your outdoor space. The deck boards are laid so that their lines run from side to side in a sleek fashion creating a dynamic look.
This pattern is great for grabbing attention and drawing peoples’ eyes to your deck area. It will create a unique dimension that’s perfect for large spaces and decks that are split into multiple sections.
The diagonal pattern will help to highlight the different sections of your deck whilst also helping it to appear as a complete and cohesive space.
Diagonal deck board patterns bring a contemporary feel to an outdoor living space and perfectly complement modern deck-railing systems such as glass railing, metal railing, and cable railing.
Installation note – diagonal deck board patterns are fairly complex and need a specific support system and deck frame. It should only be attempted by those with experience in DIY and we’d recommend consulting a professional contractor for assistance.
4. Transitional boards (easy)
Another popular deck layout is the transition board pattern. This is a subtle variation on the single width pattern and is fairly easy to install. To achieve this pattern, you lay one or more transitional boards perpendicular to the other composite decking boards that make up the deck.
It adds a splash of character to the more basic single width pattern and helps to create separation between different areas of your deck. It can also help you to save some money by using shorter lengths of decking boards.
It also allows you to experiment by using different shades of deck boards for the transitional boards to give your deck a unique look and stylish feel. Transition board patterns are an easy way to spice up the appearance of your outdoor living space without having to get too complex.
Installation note – when installing the transition board, you need to make sure that you use two deck joists for each board. One should be placed at either end to provide added deck support. You should also form a deck board attachment connection by using butt joint hardware.
5. Pinstripe deck patterns (moderate)
This is one of the rarer deck patterns that you don’t commonly see in many outdoor spaces. It’s a subtle design that adds an element of cool to your deck area, and as it’s not overly used, it can be a fairly unique layout.
The two most common layouts for the pinstripe pattern are to have two narrow boards in between standard boards or two narrow boards set between two wide-width deck boards. This simple approach will achieve the elegant look of pinstripes and give your deck a touch of class.
The pinstripe pattern is elegant and sophisticated but isn’t overpowering. This means it won’t draw focus from any of your other deck features, such as furniture, rails, or lighting.
Due to its rarity, it’s a good way for you to make your deck stand out, and it should be a good conversation starter whenever you have guests in your garden.
Installation note – installing a pinstripe pattern is quite straightforward, and it can be laid onto standard deck framing. This pattern can be achieved by those with little experience in DIY.
6. Tile deck patterns (difficult)
Tile deck patterns are complex, geometric designs that bring precision and sharp right angles to the style of your deck. This pattern uses sections of decking boards that run perpendicular to each other and break up the deck area into clearly defined segments.
The complicated nature of the design gives your outdoor space an assured sense of style and gives off an aura of confidence. This pattern is the ideal choice for those who want a bold and contemporary look to their deck area.
The defined borders between the sections of the deck give the area an enlarged sense of space. This draws the gaze outwards and makes the deck appear larger than it is.
However, to have their full effect, tile deck patterns require a large area so that the tiled pattern can be repeated several times.
Installation note – this deck pattern is pretty complex, and it requires a very specific substructure and deck joist orientation in order to support its weight sufficiently. It’s recommended that you consult with a specialist contractor before installing this pattern.
7. Herringbone deck patterns (difficult)
The Herringbone pattern is complex and detailed with the appearance and texture of a finely crafted fabric. It’s an excellent way to revitalise your outdoor space and draw attention to your deck area.
The Herringbone pattern design consists of several deck boards joining at a 45-degree angle which results in a dazzling zig-zagged pattern. To achieve this effect, short boards are used within a short framing span, and the design can be utilised for decks of all sizes.
Herringbone decking patterns can add a bit of wow-factor to your outdoor living space and elevate it to a new level of visual interest. You can also get creative with this pattern and come up with unique designs.
For example, you could try using a Herringbone pattern as a framed centrepiece for your deck with a more simple, single width pattern surrounding it. This can add a stylish flourish to an otherwise basic layout and draw the eyes of your guests.
Installation note – the Herringbone is a complex pattern that can be quite difficult to achieve if you don’t have much DIY experience. It requires a specialist support system and deck frame, and it’s best to speak to a contractor before you begin installation.
8. Chevron deck patterns (difficult)
The chevron deck design is very similar to the Herringbone pattern and is also quite complicated to install. The difference between the two patterns is that the ends of the boards in the chevron pattern meet flush together, whereas the ends of the boards in the Herringbone design overlap.
The V-shaped pattern of the chevron design creates a defined, angular flow to the decking area, which is aesthetically satisfying. It can bring a fresh and invigorating feel to your outdoor space whilst adding a dash of personality that will grab attention.
The design also has a good amount of versatility, and you can use contrasting colours to make your deck truly pop. You can also try adding in a transition board to give it a truly unique look.
Installation note – like the Herringbone design, this is a complicated pattern and is best-suited to those with experience in DIY or professional contractors. It requires a specific support system and deck framing.
Staggering Deck Boards
The majority of composite decking that’s installed is laid in the single width pattern. This is because it’s the easiest way to install decking, and it also has a simple and classic look that suits any home. When installing decking in this pattern, it’s important to stagger the boards.
Doing so will reduce the number of nails or screws that have to be put into each joist which will mean that the joists should last longer and will be stronger. It also means that the seams of the deck will be spread across more joists instead of all of the stress resting on one joist.
Staggering the boards is also more visually appealing and breaks up the deck nicely. If all of the deck seams meet in one place, it can give the deck the appearance of two decks placed next to each other, which doesn’t look great.
Creating staggered seams also gives the entire deck more strength and integrity as the points of stress are more evenly spread out rather than being concentrated in the middle.
How To Stagger Composite Deck Boards
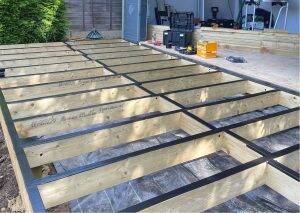
When staggering composite decking, it’s important that you get the joist structure exactly right first. You should double the joists every 1200mm starting from the outer edge of the rim joist. If you use 1200mm, 2400mm, 3600mm, or 4800mm boards, then the seam will always occur on a double joist.
Also remember to follow the manufacturer’s instructions when it comes to the gaps in between the boards. This will allow enough room to accommodate contractions and expansions in the boards during fluctuations in temperatures.
The manufacturer’s instructions for composite decking may also recommend using reverse thread screws or hidden fasteners instead of wood screws. This is usually to avoid the mushrooming effect that wood screws can have on composite decking.
If you’re using hidden clips, then these will insert into the grooved plank edge and then fasten to the framework of the joist. It is possible to attach two clips to one joist at a seam, but it’s recommended that you double the joists at the seams instead.
When using clips, it’s best to wait until the next row is in place before you tighten the screws. It should then be less difficult for you to attach the next clip into the plank groove. When the next row of clips has been partially fastened, you can then tighten the screws.
The two surfaces of the double joists should always be securely fastened together and levelled. This will ensure that the two plank ends also remain level. We’d also recommend using tape or a self-adhesive butyl membrane to keep the joist structure protected from moisture damage.
FAQs
What’s the correct gapping for composite decking boards?
You should always leave a space of between 3mm and 6mm between composite decking boards. This is to allow for the boards to contract during lower temperatures and expand during higher temperatures without the boards being damaged.
Should composite decking boards run parallel to my house?
Generally, composite boards are installed to run parallel to a house or any other building. This is done for several reasons. Parallel boards ensure proper water runoff and also have a sturdier structure than perpendicular boards. The layout is also considered to be more aesthetically pleasing.
Does my composite deck need to be sloped?
It’s usually best to install composite decking with a slight slope away from your house to encourage proper water drainage. However, as composite decking is very water-resistant, it can be kept level, as water should evaporate from its surface fairly quickly.
What’s the best way to hide the edges of composite decking boards?
One of the easiest ways to hide the edges of composite decking boards is to install fascia boards. They work in a similar way to a picture frame pattern by surrounding the perimeter of the deck and covering the edges of the boards.
The only difference is that fascia boards are installed directly over the rim joists and edges of the deck.
Final Thoughts
Ultimately, the composite decking pattern that you choose will be determined by several factors. Your own personal preferences, the size of your decking area, and the installation requirements of the specific pattern.
Although the patterns we’ve detailed in this guide are the most popular for composite decking, you still have the freedom to customise your deck and come up with your own unique designs.
Just remember, if you’re planning on installing a complex pattern, then it’s always best to consult a professional before you begin.
Check out Ecoscape’s range of composite decking colours, and you’re sure to be inspired to come up with a great layout for your deck.