Installing composite decking involves preparing a solid base, building a properly supported subframe, fixing the starter clips and securing each decking board with the correct hidden fasteners. You’ll also need to leave room for expansion, allow water to drain and finish the exposed edges.
The process is straightforward if you’re comfortable with basic woodworking and follow the manufacturer’s installation instructions. The most important part is getting the foundations and subframe right before laying the first board.
In this guide, we’ll take you through the installation process from start to finish, including the tools you’ll need, joist spacing, board fixing, expansion gaps and the mistakes worth avoiding.
What tools and materials do you need to install composite decking?
Before starting, make sure you have the right tools, decking materials and protective equipment. Having everything ready will make the job easier and reduce interruptions once the boards are being fitted.
Tools and safety equipment
- Tape measure, pencil and set square
- String line and spirit level
- Cordless drill/driver and suitable drill bits
- Circular saw or mitre saw with an appropriate blade
- Jigsaw for detailed cuts, where needed
- Suitable eye, hearing and respiratory protection
- Protective gloves, suitable footwear and knee pads
- Cable avoidance equipment when preparing ground where buried services may be present
Materials and fixings
- Composite decking boards
- Suitable subframe joists and supports
- Manufacturer-approved starter and finishing clips
- Hidden T-clips and locking clips
- Approved fixing screws
- Fascia boards or finishing trims
- Ground preparation and drainage materials, where required
Ecoscape recommends standard woodworking tools for cutting its decking, including a circular saw fitted with a suitable multipurpose blade of at least 60 teeth for a clean finish.
Always use the fixing system approved for your particular decking range. Different composite boards can have different installation requirements.
Before you start: plan your composite decking installation
A little preparation makes a substantial difference to the finished deck.
Start by measuring the space and deciding which direction the boards will run. Think about access, drainage, nearby walls, door thresholds and any features you’ll need to build around. Your chosen board layout also determines the position of the joists underneath.
If you’re still working out the size, position or design, our article on planning your composite decking project covers those decisions in more detail.
Calculate how much decking you need
Measure the area in square metres and work out how many boards you’ll need based on their actual dimensions, the laying direction and the required gaps.
Allow for cutting waste, particularly if your deck has an irregular shape or a diagonal laying pattern. You’ll also need sufficient joists, support materials, fixing clips and finishing trims.
Our guide to calculating how much composite decking you need explains the measurements and quantities in more detail.
Check whether planning permission is required
Many low-level domestic decks can be built without planning permission, but the rules depend on where you live, the height of the deck, the amount of garden covered and any restrictions affecting your property.
In England, permitted development guidance commonly refers to a maximum decking height of 300mm and limits on the amount of land covered by buildings and other additions. Requirements can differ elsewhere in the UK.
Check with your local planning authority before starting, particularly for raised structures, listed properties, conservation areas or substantial decking projects.
Storing composite decking boards before installation
Before installation, store your composite decking boards flat, in a dry, covered area away from direct sunlight, with supports underneath at intervals no greater than 500mm. Keeping the boards properly supported and protected helps prevent distortion or damage before they’re fitted.
How to install composite decking: 8 steps
The following steps explain the general installation process for Ecoscape’s composite decking systems.
Before beginning, read the installation instructions for your chosen range. Joist centres, fixing arrangements and expansion requirements must match the boards being installed.
Step 1: Prepare the ground or existing surface
The first step is to create a stable, well-drained foundation for the decking subframe.
Remove vegetation, debris and anything that could prevent the supports from sitting securely. Check the level of the site and plan where water will drain. On soil, you may need to remove turf, prepare a suitable drainage layer and install properly designed supports or foundations.
Composite decking boards should never be laid directly onto soil, grass or a flat surface without an appropriate supporting structure.
The foundation method will depend on the ground conditions, deck height and loads involved. For more detailed advice, see our guides to laying composite decking on soil and installing composite decking on concrete.
Step 2: Build and secure the subframe
The subframe supports the entire deck, so it needs to be strong, stable and correctly positioned.
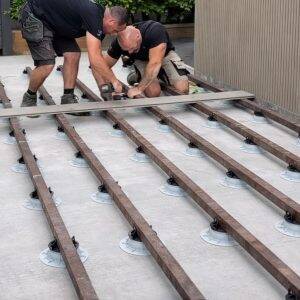
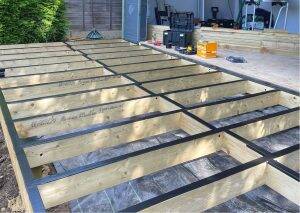
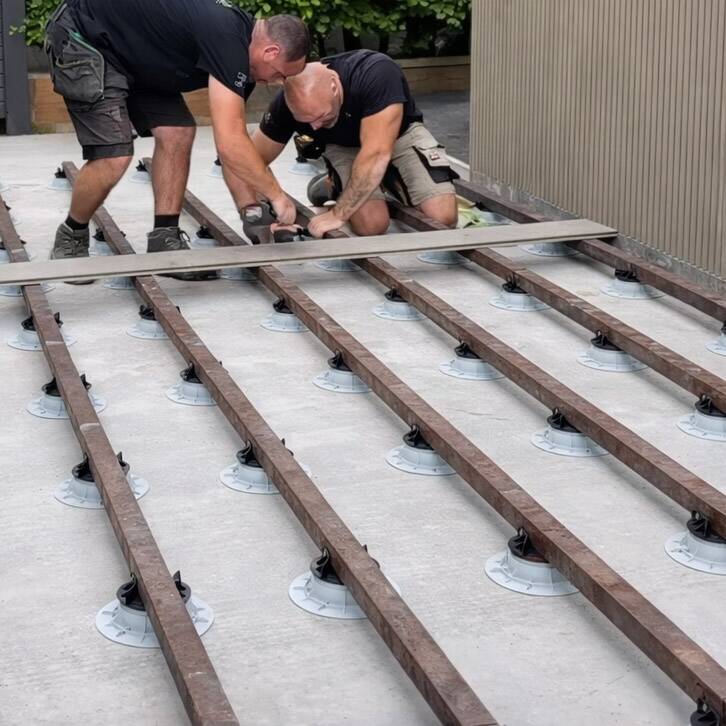
Composite decking can be installed over suitable pressure-treated timber, aluminium or compatible solid plastic joists, depending on the system and project requirements. Position the joists perpendicular to the direction of the decking boards and secure them to suitable foundations or supports.
For Ecoscape’s February 2024 installation specification:
- Joists are positioned at 400mm centres for the specified standard decking ranges.
- Linea decking requires 350mm centres.
- Board-end joints require suitable additional support, normally using double joists.
- Joists must be securely fixed in accordance with the specified subframe design.
Different layouts and products may require closer spacing, so check the instructions for the exact range you’re installing.
If using timber, protect exposed cut ends and consider suitable joist protection tape to reduce moisture exposure.
Step 3: Check drainage, ventilation and board layout
Before fixing the decking boards, check that the subframe is correctly aligned and allows water to escape.
Ecoscape recommends a gentle gradient of around 1% to help surface water drain. For grooved boards, positioning the grooves in the direction of the fall can also help water run off.
There should be a minimum of 25mm clearance beneath the decking boards for drainage and ventilation, in accordance with Ecoscape’s installation guidance. Check that surrounding walls, drains and other structures won’t obstruct ventilation or trap water underneath.
Now mark out the starting position and check the board alignment using a string line. Getting this right at the beginning helps prevent uneven rows or awkward cuts at the opposite edge of the deck.
Step 4: Fit the starter clips and first decking board
Where do you start laying composite decking boards?
Start at the planned straight edge of your deck, using the first row as the reference for the remaining boards. With Ecoscape’s grooved decking and hidden fixing system, the process is:
- Mark the position of the first board on the subframe.
- Align a starter clip centrally with the end of the first joist.
- Pre-drill and secure the clip using the specified fixing screw.
- Use a string line or decking board to align the remaining starter clips, with one clip at each joist.
- Slide the side groove of the first decking board into the starter clips.
- Check that the board is fully engaged and correctly aligned before continuing.
Take your time here. An incorrectly positioned first board can affect every subsequent row.

Step 5: Install the remaining boards with hidden fixing clips
Once the first board is in place, you can begin installing the rest of the decking.
Ecoscape uses hidden T-clips that fit into the grooves along the sides of compatible boards. These secure the boards to the subframe while maintaining the required spacing. To install the next board:
- Insert a hidden T-clip into the exposed groove of the first board at each joist.
- Partially secure the T-clips to the joists, without fully tightening them.
- Install the appropriate locking clip at the specified position, generally near the centre of the board.
- Slide the second board into the T-clips, ensuring it is fully engaged.
- Secure the previous row of T-clips using the approved screws and supplied driver bit.
- Repeat the process for each new board.
The locking clip is particularly important. It helps control how the board expands and contracts as temperatures change.
Avoid over-tightening fixings or using substitutes that are not approved for the system.

Step 6: Allow for expansion and spacing between boards
Composite decking expands and contracts as the temperature changes. If boards are installed without the correct gaps, they can push against one another or surrounding structures. There are two main types of spacing to consider:
- Side-to-side spacing: The approved hidden fixing clips establish the gap between adjacent rows of boards.
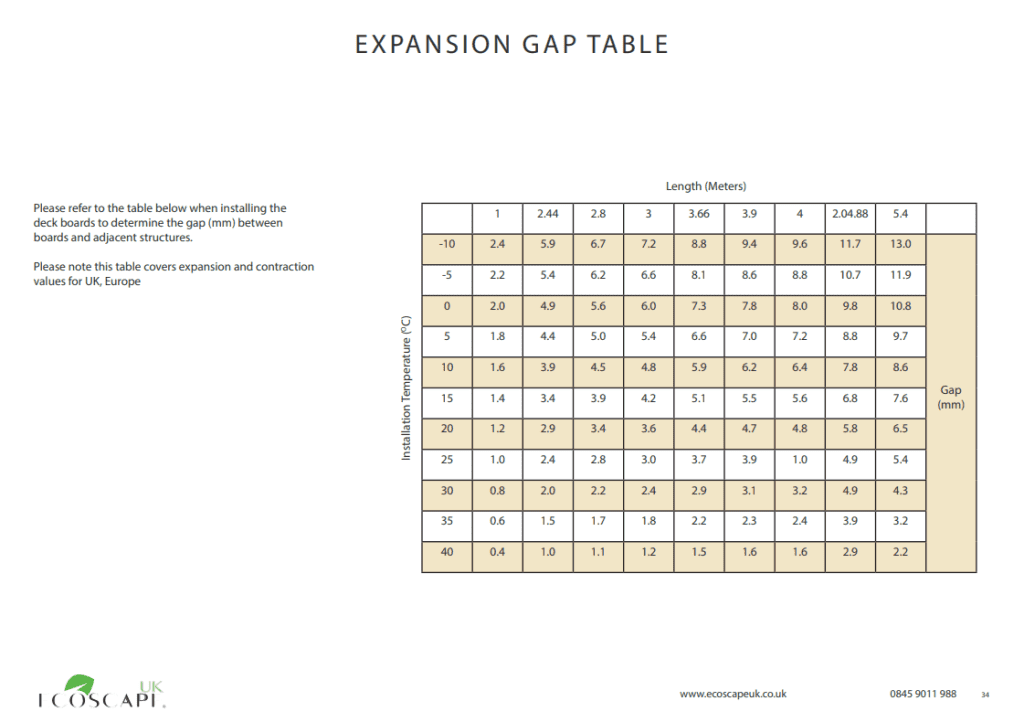
- End gaps and clearance around fixed structures: These depend on the board length, installation temperature and manufacturer’s requirements.
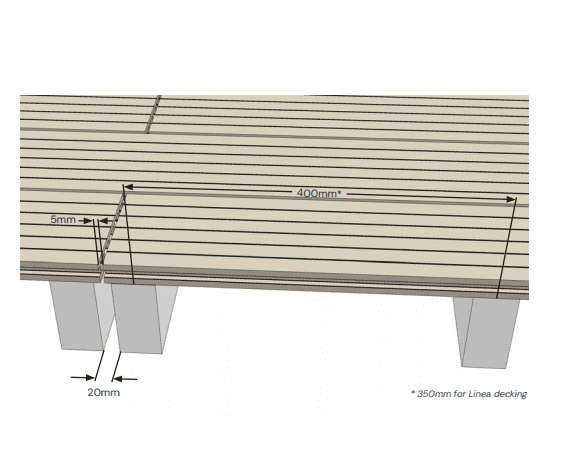
Do not assume that one standard gap measurement will work for every installation. Use Ecoscape’s expansion gap table to establish the correct clearance for your boards and the conditions on the day of installation.
Where two board ends meet, provide the correct support beneath the joint, normally with a double joist arrangement, and maintain the specified end gap.
Use the relevant Ecoscape expansion gap specifications for your decking range, board length and installation temperature.
Step 7: Measure and cut the final boards
As you approach the end of the deck, measure the remaining space carefully.
Check whether the final board needs trimming and whether there is sufficient room for the approved finishing clips or edge detail. Composite decking can generally be cut using suitable woodworking equipment. For clean, accurate cuts:
- Measure twice before cutting.
- Support the board securely.
- Use an appropriate sharp blade.
- Follow safe cutting practices and wear the recommended protective equipment.
- Avoid dragging cut boards or tools across finished decking surfaces.
When making cuts around posts, walls or other fixed features, remember to leave the required expansion clearance. Fit the final board and finishing clips according to the installation instructions for your particular Ecoscape range.
Step 8: Fit the decking edging and finishing trims
The last stage is to finish the exposed edges and check the installation.
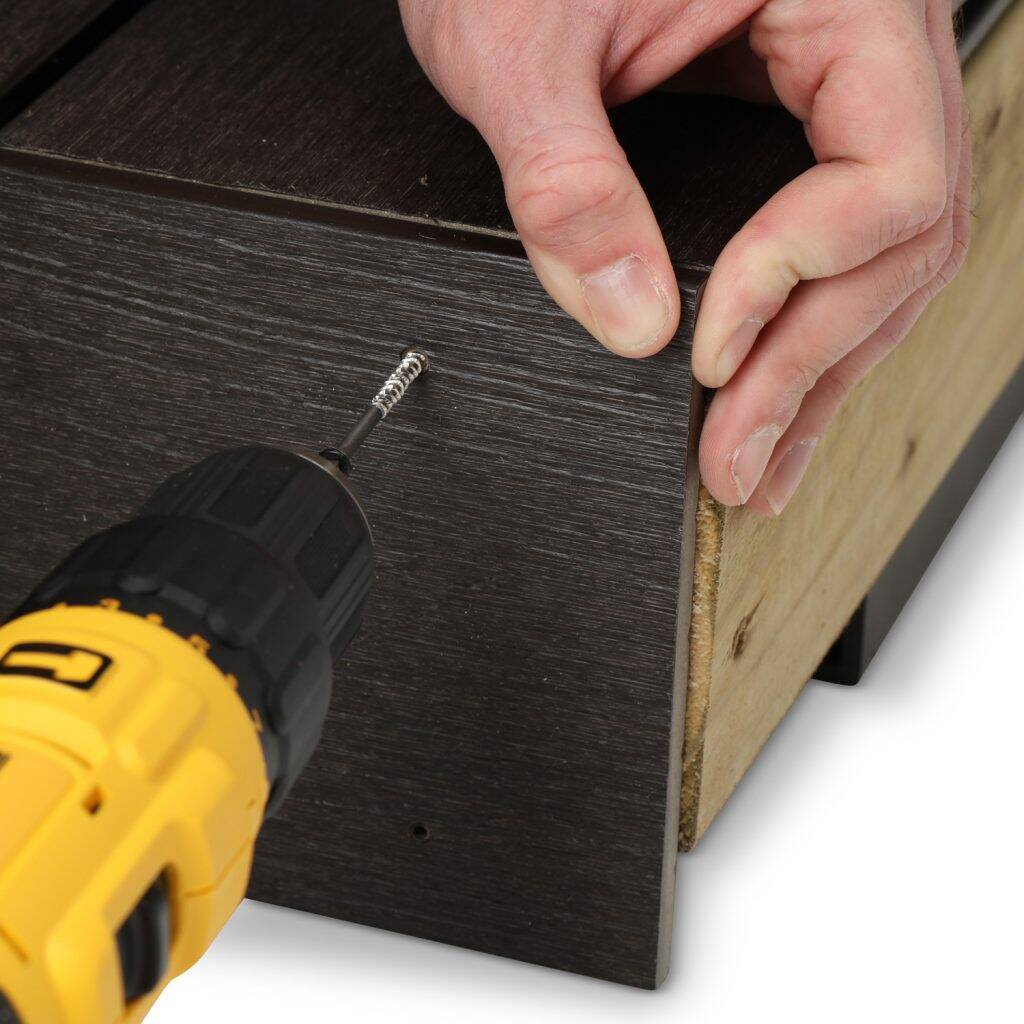
Depending on the chosen decking range and design, you may use fascia boards, angle trims or dedicated solid-edge boards. Where the finishing system requires screws, pre-drill and countersink as specified, using the manufacturer’s approved colour-matched fixings.
These approved finishing methods are different from fixing the main grooved decking boards directly through their faces.
Before using the deck, check that:
- All boards and fixings are secure.
- The required expansion gaps have been maintained.
- Water can drain freely.
- There are no unsupported board ends.
- Edging and finishing trims are correctly attached.
- No sharp fixings, offcuts or construction debris remain.
Your composite decking installation is now complete.
Common mistakes to avoid when installing composite decking
Most installation problems are caused by issues that could have been prevented during preparation or fixing. Some of the most important mistakes to avoid include:
- Using an unsuitable subframe. An existing timber frame may look sound but still have incorrect support spacing, insufficient strength or hidden deterioration.
- Positioning joists too far apart. Inadequate support can cause decking boards to flex or move underfoot.
- Forgetting expansion gaps. Boards need room to expand and contract without pressing against walls or neighbouring boards.
- Using incorrect fixings. Screwing directly through the face of grooved decking boards instead of using the specified clip system can restrict movement and damage the boards.
- Ignoring drainage and ventilation. Trapped water and poor airflow can affect the substructure and long-term performance.
- Failing to support board-end joints. Unsupported joints can move or deflect when walked on.
- Following the correct installation sequence, rather than rushing to lay the boards, is the best way to avoid these problems.
For additional detail, read our guide to common mistakes when installing composite decking.
Frequently asked questions about composite decking installation
Can I install composite decking myself?
Yes. Composite decking can be a DIY project if you are comfortable using woodworking tools, constructing a suitable subframe and following the manufacturer’s installation instructions.
However, larger raised decks, complex foundations and projects carrying particularly heavy loads may require professional design or installation. Structural safety should always come before saving on labour costs.
What should composite decking be laid on?
Composite decking should be installed over a secure, correctly supported subframe, with sufficient ventilation and drainage beneath the boards.
Depending on the installation system, the joists may be made from pressure-treated timber, aluminium or suitable plastic.
The supporting structure can be built over appropriately prepared ground, concrete or other suitable foundations.
Can you lay composite decking on wooden joists?
Yes. Ecoscape composite decking can be installed on suitable pressure-treated structural timber joists, provided they meet the required specification, support spacing and fixing arrangements.
Check the condition of any existing timber before reusing it. An old frame should not automatically be considered suitable simply because it previously supported wooden decking.
Can you install composite decking over an existing deck?
You should not install Ecoscape composite decking directly on top of existing decking boards. The boards must be fitted to a suitable supporting subframe. If you plan to reuse an existing timber structure, first check that it is sound, structurally suitable and meets Ecoscape’s requirements for joist spacing, drainage, ventilation and fixings.
For more information, read our article on installing composite decking over an existing wooden deck.
Can you install composite decking with screws?
Screws are used to attach the approved clips and certain finishing components, but Ecoscape’s grooved decking boards should be secured using the specified hidden fixing system.
Driving ordinary decking screws directly through the face of these boards can restrict movement and cause damage.
For more detail, see our explanation of why screwing directly through composite decking can cause problems.
Follow Ecoscape’s Composite Decking Installation Guide
Every decking project is slightly different, and the exact fixing instructions depend on the boards, substructure and accessories being used.
This article explains the overall installation process, but it should be read alongside Ecoscape’s official technical instructions. For detailed diagrams, fixing specifications, expansion gap requirements and installation methods, refer to our Composite Decking Installation Guide (PDF, February 2024).
If you’re unsure about the correct components or how to approach an unusual installation, contact the Ecoscape team before starting work.